


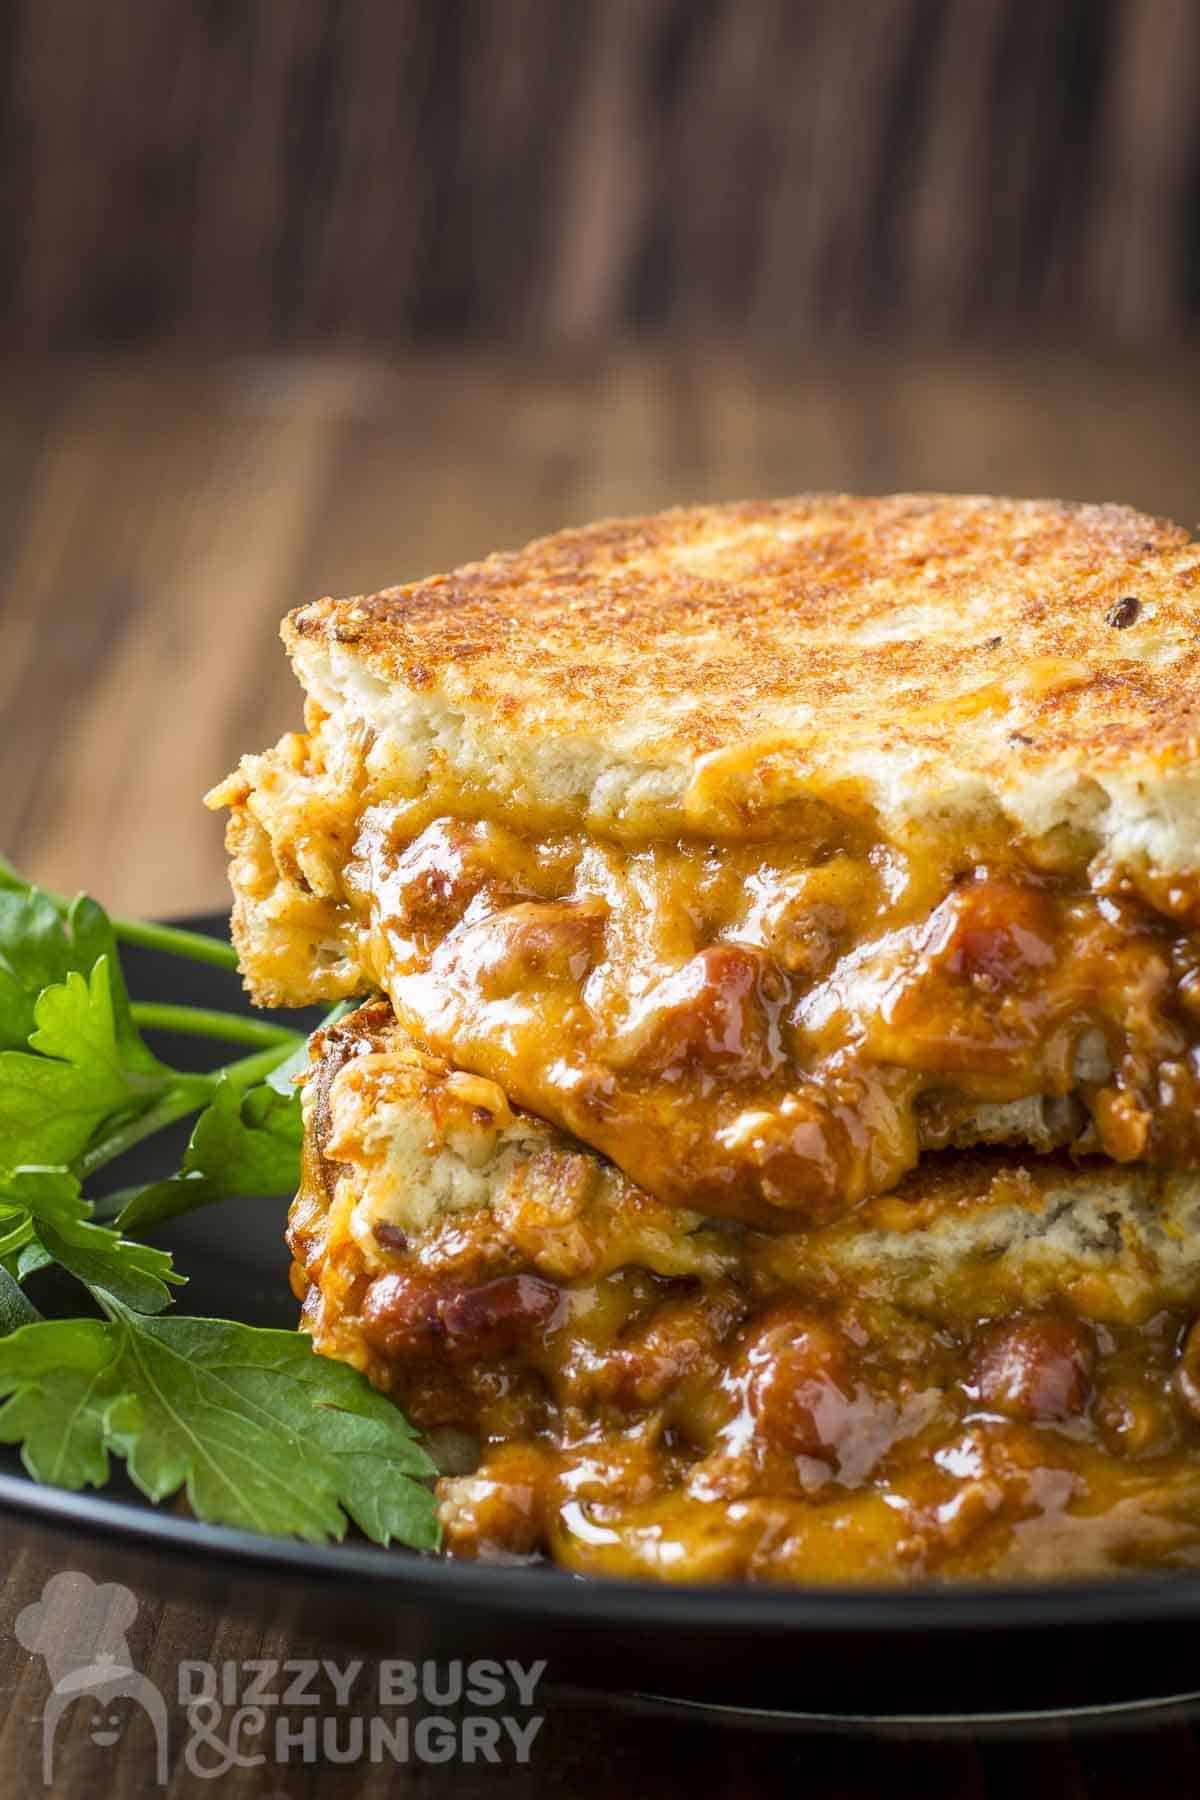
Make this Chili Sandwich with Cheese for a filling and fun take on the classic dish! A great way to use up leftover chili, the whole family will love this hearty dish.
It features crispy, buttery grilled bread and a melty, gooey cheese filling. The end result is an upgraded version of a grilled cheese sandwich that's packed with flavor!
Jump to:
- 🩵 About This Recipe
- What readers are saying...
- 🧂 Gather Your Ingredients
- 🔪 Let's Make a Chili Sandwich!
- 💡 Expert Tips and Tricks
- ❔ FAQs
- 📝 Substitutions and Variations
- 🥡 Storage and Reheating
- 🍴 What To Serve With This Dish
- 😋 More Grilled Sandwich Recipes You'll Love
- 📋 Recipe Card
- Chili Cheese Grilled Sandwiches
- 💬 Reviews and Comments
🩵 About This Recipe
Grilled cheese is one of my go-to dinners during the week. Everyone loves it, it is quick and easy, and it doesn't require a lot of brain power. The ingredient list is short and generally involves items I already have in the house.
But, it is so simple that it can get a little old after a while. Luckily, grilled sandwiches are so versatile; there are probably hundreds of varieties you can think up. This chili sandwich version only adds one ingredient but takes your grilled cheese to the next level!
For even more fun grilled sandwich recipes, try my Grilled Cheese with Mushrooms and Pesto or this Grilled Cheese with Roasted Red Peppers.
What readers are saying...
Great❤️ Me and my daughter loved them will be making again
- Kayla
🧂 Gather Your Ingredients
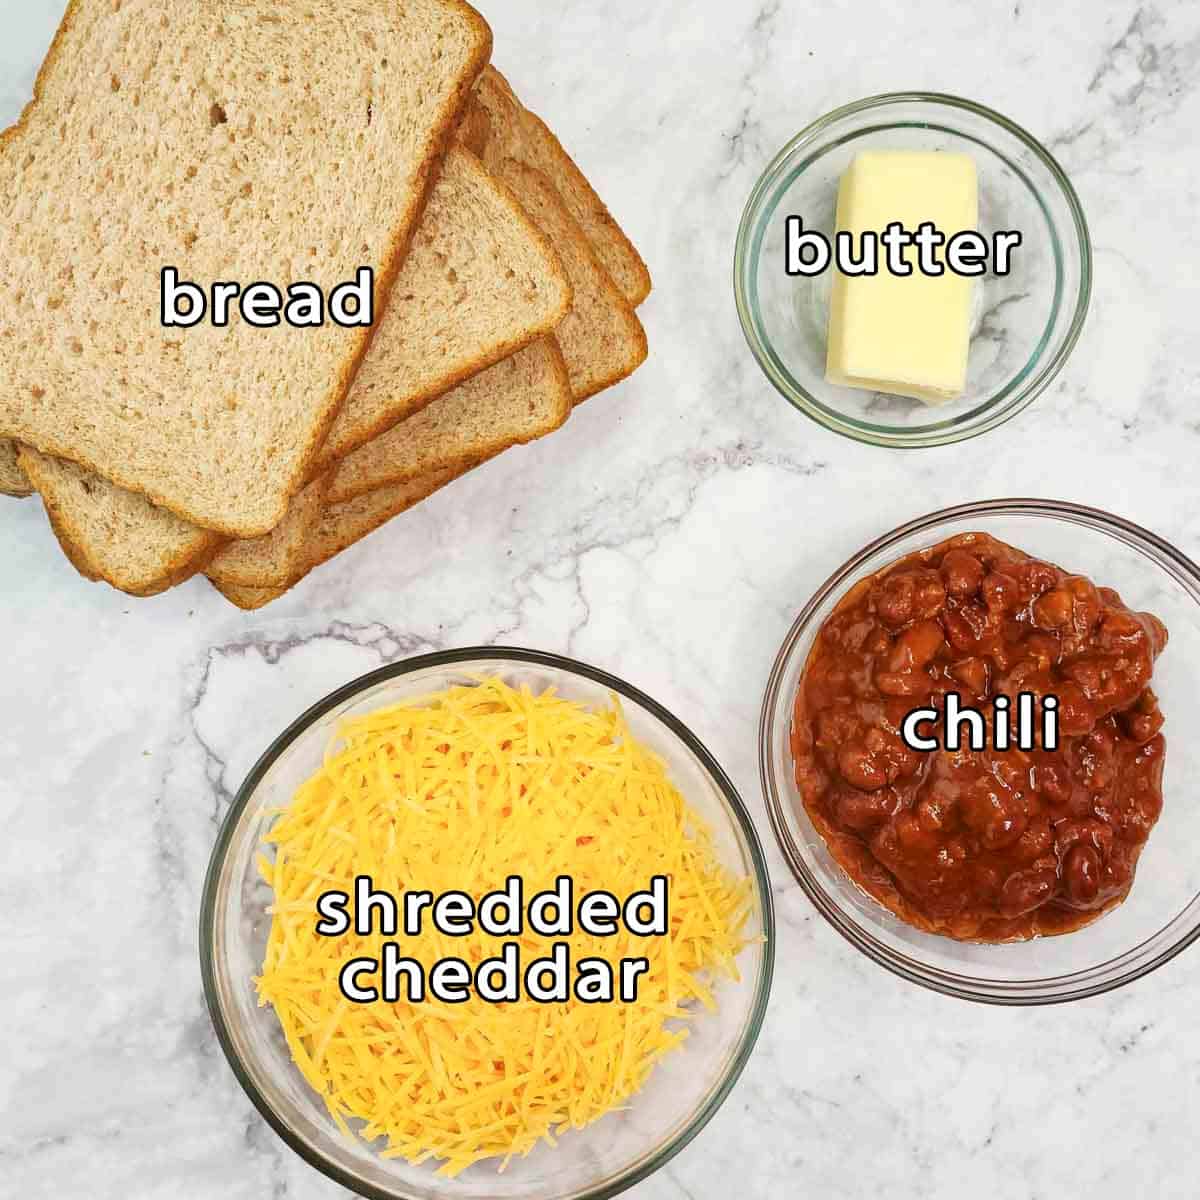
- chili - this is a great way to use leftover chili, but you can also use canned chili for a shortcut.
- shredded cheddar cheese - I've found that cheddar works really well in this recipe, but other kinds of cheese might be good as well!
- butter - helps the bread gets nice and golden brown when cooking
- bread - feel free to use whatever kind of bread you like.
🔪 Let's Make a Chili Sandwich!
(Or click here to jump right to the recipe card with measurements!)
Prepare Filling
In a medium bowl, combine the chili and shredded cheddar cheese. Set aside.

Butter Bread
Butter one side of the bread, and place the slices face down on a baking sheet.

Add Filling
Distribute the chili and cheese mixture over the slices on the baking sheet.

Bake
Place the remaining slices of bread on top of the chili and cheese mixture. Bake at 450 for 5 to 6 minutes, then flip and bake another 5 minutes or until bread is golden brown and cheese is melty.
💡 Expert Tips and Tricks
- The chili filling will probably ooze out of the sandwiches a bit as it bakes, so lining your baking sheet with parchment paper will help eliminate cleanup time.
- Check your sandwiches around 3 to 4 minutes in. Ovens can sometimes run hotter and you don't want the bread to burn.
- Spread the filling evenly to make it easier to flip the sandwiches and promote even cooking.
- You can also grill your sandwich on a griddle, or sauté pan, or stovetop grill pan. Wherever you would normally make grilled cheese sandwiches will be fine. Just remember that the filling may get a little messy!
❔ FAQs
Most chili recipes will include beef and beans in a stew flavor with chili peppers or chili powder. Other ingredients commonly found in chili include onions, garlic, and bell peppers.
Be sure to flip the sandwiches halfway through baking so both sides get nice and crispy. If that doesn't work, try using a little less chili or thickening the chili and cheese mixture with some more cheese.
Cheddar cheese is typically associated with chili, and both sharp and mild cheddar are great options. A jack cheese or smoked Gouda are also delicious with chili!

📝 Substitutions and Variations
- You can use leftover chili, or make your own, or even use store-bought chili.
- This chili sandwich works with all different varieties of chili! Meatless, chicken chili, etc. Different varieties give this dish a different spin, but they are all delicious!
- Pepper jack, Colby jack, or even a Mexican blend also work well with this recipe.
- For more flavor, add a layer of jalapenos or pickled onions.
Kristin's Kitchen Tip
Make sure you use a thicker chili rather than a soupier one! If it's too liquidy, it might soak the bread and cause your chili grilled cheese to fall apart.
🥡 Storage and Reheating
This chili grilled cheese is best enjoyed fresh, but if you have leftovers, store them in the fridge in an airtight container for 3 to 4 days. You can reheat them in the oven, in an air fryer, or in a skillet. The microwave will make them soggy.
Keep It Handy
Don't have time for this chili sandwich recipe right now? Click on or tap the heart icon on the BOTTOM RIGHT of the screen to save it for later!
🍴 What To Serve With This Dish
This chili sandwich recipe goes perfectly with a bowl of tomato soup and a light side salad. You can also serve more chili on the side with some sour cream and green onions.
😋 More Grilled Sandwich Recipes You'll Love
- Turkey and Brie Grilled Cheese - This is a great way to use leftover turkey and turn it into a brand new meal!
- Chicken Grilled Cheese - With a satisfying Parmesan crust, this is an easy upgrade to classic grilled cheese.
- Top 5 Grilled Sandwiches - This roundup from Spruce Eats has 5 amazing options for delicious and easy grilled sandwiches.
- 50 Insanely Good Grilled Cheese Recipes - Can't get enough grilled cheese recipes? Check out 50 more fun variations!
get your copy now!

Need help with dinner?
- 24 quick, delicious recipes
- 1 month of meal plans
- pre-filled grocery lists
- and more!

Chili Grilled Cheese
⭐ Did you make this recipe? Awesome! I would love to hear from you. Please give it a star rating and review below! 👇
📋 Recipe Card

Chili Cheese Grilled Sandwiches
Ingredients
- 1 cup chili
- 1 ½ cups shredded cheddar cheese
- 8 slices bread
- 4 tablespoons butter
Instructions
- Preheat oven to 450 degrees F.
- In a medium bowl, combine the chili and shredded cheddar. Set aside.1 cup chili, 1 ½ cups shredded cheddar cheese
- Butter one side of each of the 8 slices of bread. Place 4 of the slices buttered side down on baking sheet.8 slices bread, 4 tablespoons butter
- Distribute the chili and cheese mixture over the 4 slices of bread.
- Place the remaining 4 slices of bread on top of the chili and cheese mixture, buttered side up.
- Bake in the oven 5-6 minutes, then flip the sandwiches and bake about 5 more minutes, until the sandwiches are golden brown and crispy.
Notes
Prep Tips:
- This recipe is perfect for using up leftover homemade chili, but store-bought works just fine too. Just make sure it's thick, not soupy, so the sandwiches hold together better.
- Line your baking sheet with parchment paper for easy cleanup since the chili-cheese filling can get melty and ooze out as it bakes.
- If you've never made grilled cheese in the oven before, check the sandwiches around the 3-4 minute mark. Ovens vary, and you don't want the bread to brown too fast.
- Spread the filling evenly and avoid overstuffing to make flipping the sandwiches easier.
Variations:
- Any chili works here - beef, turkey, chicken, or even meatless chili are all great options.
- Swap cheddar for pepper jack, Colby jack, or a Mexican blend if desired.
- Add a thin layer of sliced jalapeños or pickled onions inside the sandwich if you like a little heat or tang.
- Prefer stovetop cooking? These sandwiches can also be made in a skillet or on a griddle, just like classic grilled cheese.
Serving Suggestions:
- Serve these sandwiches hot and crispy, straight from the oven, while the cheese is still nice and melty.
- They're hearty enough on their own, or you can serve alongside a simple green salad or a bowl of soup.
- For dipping, warm extra chili on the side or serve with sour cream.
Storage Info for Leftovers:
- Leftover sandwiches can be stored in an airtight container in the refrigerator for up to 3-4 days.
- Reheat in the oven or a skillet to help the bread crisp back up - the microwave works, but the bread will be softer.
- These are best enjoyed fresh, as the chili filling can make the bread soggy over time.
Video
Nutrition
Nutritional information is an estimate. The nutritional values for your final dish may vary based on measuring differences and products used.
Update Notes: This post was originally published in January 2019, and was republished with tips, step by step photos, and a recipe change in February 2026.
Thanks so much for reading! I also invite you to follow me on FACEBOOK, PINTEREST, or INSTAGRAM to keep up with what's going on in my kitchen.
And you might want to check out my Dizzy Busy and Hungry store on Amazon for a whole bunch of great kitchen products I love!
Happy cooking!


Kayla says
Great❤️ Me and my daughter loved them will be making again
Kristin says
Oh, wonderful to hear! Thanks so much for letting me know. 🙂 Have a great day!
Miz Helen says
Congratulations!
Your post is featured on Full Plate Thursday this week. Thanks so much for sharing your awesome post with us and hope you are having a great week.
Miz Helen
b says
whoa this looks messy and delicious!
b
Kristin says
Yep, totally messy and delicious! 🙂
Antonia says
What a great way to use up leftover chili! My family would love this! Thank you for sharing at Fiesta Friday!
Kristin says
Thanks, Antonia! I appreciate you stopping by!
Maria | passion fruit, paws and peonies says
What a wonderful weekend treat! I would make this as a brunch for when my son comes to stay xx
Christina says
This is such a delicious twist on a classic! I'll be making this recipe over and over again!
Kristin says
Thanks! I hope your family loves it as much as mine does! 🙂
Marsha Maxwell says
Even better than a regular grilled cheese! I know my teen son would love this.
Kristin says
My teen guys are huge fans. They would eat this every night if I would let them, haha! 🙂 Thanks for stopping by!